Monday, February 28, 2011

How To Make Custom Icon To Your Bolg

Hello ,


when you make blog @ blogspot its give you default icon 

let me tell you how to change it with your Own icon like this 


Step 1 : design your icon with 16x16 or 20x20 size .

Step 2 : Goto : Design > Edit HTML > and Check " Expand Widget Templates " Box .


Step 3 : Find this code .

<b:skin>

Step 4 : Just before the above code paste this code

<link href='PUT YOUR ICON LINK HERE' rel='shortcut icon'
type='image/vnd.microsoft.icon'/>


And dont forget to put your icon link


if your icon with other format like .png or so , Just change " .icon " to your format in the above code .


Now save your work and Have Fun :)

Sunday, February 27, 2011

How To Open External Link In A New Page - Blogger

Hello ,


In This tutorial i will show you  How To Open External Link In A New Page .


Step 1 : Goto : Design > Edit HTML > and Check " Expand Widget Templates " Box .


Step 2 : Find this code 

]]></b:skin>
 
Step 3 :  paste the following code after it
 
<script language='javascript'>
var dominio = "www.pctut.blogspot.com";
var dominio1 = "pctut.blogspot.com";
var script = "javascript:void(0);";
var imagenesblogger0 = "bp0.blogger.com";
var imagenesblogger1 = "bp1.blogger.com";
var imagenesblogger2 = "bp2.blogger.com";
var imagenesblogger3 = "bp3.blogger.com";
var blogger1 = "www.blogger.com";
var blogger2 = "www2.blogger.com";
var publicidad = "pagead2.googlesyndication.com";
function LinksExternos() {
var Externo;
if (document.getElementsByTagName('a')) {
for (var i = 0; (Externo = document.getElementsByTagName('a')[i]); i++) {
if (
Externo.href.indexOf(dominio) == -1 &amp;&amp;
Externo.href.indexOf(dominio1) == -1 &amp;&amp;
Externo.href.indexOf(script) == -1 &amp;&amp;
Externo.href.indexOf(imagenesblogger0) == -1 &amp;&amp;
Externo.href.indexOf(imagenesblogger1) == -1 &amp;&amp;
Externo.href.indexOf(imagenesblogger2) == -1 &amp;&amp;
Externo.href.indexOf(imagenesblogger3) == -1 &amp;&amp;
Externo.href.indexOf(publicidad) == -1 &amp;&amp;
Externo.href.indexOf(blogger1) == -1 &amp;&amp;
Externo.href.indexOf(blogger2) == -1
)
{
Externo.setAttribute('target', '_blank');
//Externo.setAttribute('class', 'linkexterno');
}
}
}
}
window.onload = function() {
LinksExternos();
}
</script> 
 
Step 4 : Change " www.pctut.blogspot.com " and " pctut.blogspot.com "
with your blog name .

Step 5 : Save and Have Fun :)

How To Disable Auto Sleep in Ubuntu

Hello ,


In this tutorial i will show you how to - Turn Off / On - Automatic Sleep in Ubuntu


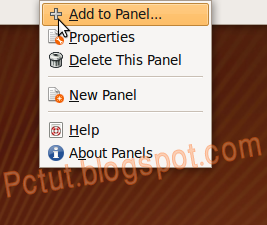
Step 1 : Right click on your  top panel then chose ( add to panel )


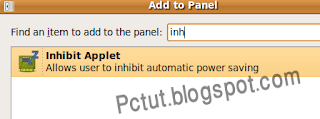
Step 2 : Type ( Inhibit Applet ) Then click Add .


Now you are able to Turn Off / On Automatic Sleep , Just click on the new button you just added .


Have Fun :)

How To Extract .RAR Files in Ubuntu

Hello ,


when you try to extract .rar files under ubuntu system its will NOT extract ..!


how to extract any .RAR files easy and quick ?


you just need to install small package called " unrar " 


Step 1 : goto your Terminal  then type
sudo apt-get install unrar
and press ENTER .


It will ask you for password, type your user password and press ENTER .


Step 2 : There is no step 2 , you can now extract your .RAR file by "right-click" then chose " extract here "


Have Fun :)

How to Create your Own Custom Jump List .

How to Create your Own Custom Jump List !


How to Install JumpList Launcher

First, you need to download and install Jumplist-Launcher. On this page you can also read more about its features and limitations.
Click on the download link and save the archive. Now open the archive and extract the JumplistLauncher.exe file to any location you desire.
Jumplist-Launcher
Double click on the JumplistLauncher.exe file to open the application.
Jumplist-Launcher

How to Add an Item to JumpList Launcher

To add an item to a custom jump list, click on the File button. Browse to the file that you want to add and double click on it.
Jumplist-Launcher
Alternatively you can browse in a Windows Explorer window to the file that you want to add and drag-and-drop the item to the 'JumpList Launcher' window.
To change the default icon, click on the button right next to the 'Icon:' text from the Optional section. Browse, choose the file which contains the icon you prefer and double click on it.
Jumplist-Launcher
NOTE: You can choose image files or any other files that already have a default icon. These files are generally executable files, with the extension '.exe'.
Now repeat the procedure until you add all the items you want to have in your custom jump list.
The maximum number that you can add to the jump list is 60. You can personalize this number in the 'Max. Jumplist-Items' field. Click on the small arrows to increase or decrease the number of items and then click on the Save button. To update the jump list with the new settings, click on the big 'Create Jumplist' button.
Jumplist-Launcher

How to Use Command Line Parameters

As you will probably notice, 'Jumplist Launcher' has support for parameters. A parameter is a command line argument sent to an application that is being executed which can command it to make a specific action.
To better understand what a parameter is and how to use it, let's see a practical example: let's say that every time we start Firefox, we want it to start in safe mode. To do this, simply write in the Parameters text box the following: -safe-mode. Then click the 'Save Changes to Entry' button and, to update the jump list, click on the 'Create Jumplist' button.
Jumplist-Launcher
NOTE: More information about on command line parameters can be found on this page from Wikipedia. Each application has its own parameters and you have to search for them online. You can find relevant results if you search for command line arguments in Google or any other search engine.

How to Add a Folder or Group

If you want to, you can even add folders or groups to your custom Jump List. To add a folder, click on the Folder button and browse to the folder that you want to add. Then click on OK. If you want to cancel, click on the Abbrechen button (unfortunately, there still are some buttons which were not translated in English).
Jumplist-Launcher
Groups are categories with which you can sort your applications. For example, you can add a group called Browser where you can add all the browsers that you use. To add a group, just click the Group button.
Jumplist-Launcher
NOTE: If you don't want to have any Groups in your custom jump list, you can very easily disable them: check the 'Create Tasklist (no categories)' option and click on the 'Create Jumplist' button to update the jump list. Now your custom jump list will have only items, no groups or categories.
Jumplist-Launcher

How to Edit Items

To edit a file or a folder from the custom jump list, select it and use the options from the left side of 'JumpList Launcher' to modify its icon or name. Then click on the 'Save Changes To Entry' and update the custom jump list by pressing the 'Create Jumplist' button.
Jumplist-Launcher
You can also edit the name of a group, folder or file by selecting the item and then clicking one more time on its name. Now write the name that you want and press the Enter key from your keyboard.
Jumplist-Launcher
Another thing that you can modify, it's the position of an item in the jump list. Use the Up and Down arrows to move each item or group. Also, you can delete any item simply by pressing the big red X button.
Jumplist-Launcher

Know issues with JumpList Launcher

If you change the default number of Jump List items in this application, you will also change the number of Jump List items that will appear when you right-click on any other item that is pinned to the taskbar. In other words, this option will automatically update the 'Number of recent items to display in Jump Lists', an option available in the 'Customize Start Menu' window.
You can reach the 'Customize Start Menu' window if you right-click on the Start Menu orb, select Properties and, in the new window, click on Customize.
Jumplist-Launcher
If you have the option 'Store and display recently opened items in the Start menu and the taskbar' disabled, JumpList Launcher will not work properly. When you will push the 'Create Jumplist' button, you will receive this message error:
Jumplist-Launcher
To fix this, simply right-click on the Start Menu orb and select Properties from the menu.
Jumplist-Launcher
Check the option 'Store and display recently opened items in the Start menu and the taskbar' and click on Apply.
Jumplist-Launcher
Now click again on the big 'Create Jumplist' button to create the custom jump list.

Source : http://knowallforfree.blogspot.com/2010/11/how-to-create-your-own-custom-jump-list.html

Awesome Cars Wallpapers Pack


Download Awesome 80 Cars on black background Wallpapers Pack

Size : 9 MB

Download Links :


HotFile

Duckload

Fileserve

Megaupload

Uploading

Depositfiles

Have Fun :)

31 Nature HQ Wallpapers ..


Download 31 Beautiful Nature HQ Wallpapers Pack

Size : 15 MB

Please choose server for download..


Download Links :


HotFile

Duckload

Fileserve

Megaupload

Uploading

Depositfiles

Have Fun :)

How To Switch Your Menu Position From Right To Left in Windows 7

Hello guys ,

If you want to change your menu position from right to left in windows 7 its realy  easy and quick 

just a few steps ..

Step 1 : Open Your Control Panel Then open "Tablet PC Settings" .

Step 2 : Just Check the point _ Right-handed _ to change it .


Step 3 : Click Apply Then Ok , And Have Fun :)

How to Remove Graphics Card Entries from Desktop Menu in Windows 7

hello ,

In this tutorial i'll show you 
How to Remove Graphics Card Entries from Desktop Menu in Windows 7
That's help to Make the PC little Faster !

When you right-click on your desktop it looks like that 


let me tell you how to remove this graphics card lines 

Step 1 : open RUN from start menu and type regedit then press ENTER . 
Step 2 : goto  

HKEY_CLASSES_ROOT\Directory\Background\shellex\ContextMenuHandlers
Step 3 : you will see keys "looks like folder at the left-side " Delete igfxui (if your card : Intel), NvCplDesktopContext (if your card nVidia) or other similar keys for your graphics card.

Now right-click on your desktop and it will look like that


Have Fun :)

How To Add “Hide File Names” Option in “View” Menu - Windows 7

Hello ,

This guide will show you
How To Add “Hide File Names” Option in “View” Menu in Windows 7 .


Step 1 : Open any folder to this option ,
you can open D: drive if you want apply to all folders in drive D: .


Step 2 : Right-click on a blank area in the folder and select "Customize This Folder...".


Step 3 : select "Pictures and Videos" option from "Template" drop-down box. Pictures and Videos options are given separately. You can select any of them.

And If you want to add the option "Hide File Names" to a particular folder then make sure to un-check the option "Also apply this template to all subfolders", otherwise enable this option.


Step 4 : Apply it and click Ok .


Now you'll get an extra option "Hide File Names" in "View". Which can hide file/folder names in that particular folder.

Have Fun :)

How To Enable Hidden Secret Control Panel Items in Windows 7

Microsoft has disabled some items in Control Panel in Windows 7


those hidden items are useful and might be very important for some users,


Lest see how to enable those items :)


Step 1 : Open RUN or Startmenu Search box and type regedit then press enter .


Step 2 : Now go to 


HKEY_LOCAL_MACHINE\SOFTWARE\Microsoft\Windows\CurrentVersion\Control Panel\don't load


Now you have to delete some .cpl files in right side , but you need to take permission  before delete anythign ,


how to make it ??


Step 3 : do those steps


# Right-click on the "don't load" key and select "Permissions...".
# Click on "Advanced" button.
# Go to "Owner" tab.
# Select your Username from the list and click on "Apply" button and then OK.
# Again click on OK button in the first dialog box.
# Now Right-click on the "don't load" key and select "Permissions..." Again .
# Select your Username in the list and check the "Allow" option for "Full Control".
# Click on Apply button and then OK.


Now you can delete .cpl files ..
just delete those files 


appwiz.cpl
bthprops.cpl
desk.cpl
Firewall.cp
joy.cpl
hdwwiz.cpl
infocardcpl.cpl
ncpa.cpl
sysdm.cpl
collab.cpl
irprops.cpl
tabletpc.cpl

Now Check Your Control Panel

Have Fun :)


Friday, February 25, 2011

Welcome :)

Hello ,
welcome to Pc Tutorials ,
i will add easy , new , cool tutorials soon :)

Twitter Delicious Facebook Digg Stumbleupon Favorites More